
How to design with SolarEdge
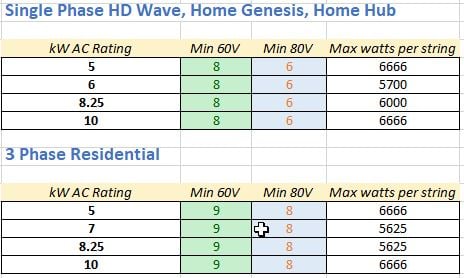
String lengths
Mounting Optimisers
Take the max watts on a string below, then divide it by your panel wattage and round down.
Orientation is not cruicial with SolarEdge as you have an optimiser on every panel, so they all have their own MPPTs.
Remember you need a minimum of 6-8 optimisers+panels in light for the string to function well.
60V optimisers include P401/S440/S500 - 80V optimisers include P505/S500B
CAUTION: Avoid the two most common mistakes when mounting DC optimisers.
- NEVER fix with a rattle gun/impact driver as they damage the optimiser - use a torque wrench or drill
- ALWAYS leave a gap between the optimiser and the rail, as per clearances, to allow heat dissipation
Set the Grid code to Region A in NSW/ACT/QLD/VIC
Setapp walk through, how to pair the optimisers
Country Grid Code
From Dec 18th 2021, under 4777.2:2020 inverters need to be commissioned to "Region A" for small grid connected systems in NSW/ACT/SA/QLD and VIC.
Do NOT leave them on the shipping default - "Australia".

Trouble connecting Setapp to the inverter
Inverter LED guide
SolarEdge Metering Troubleshooting Wizard
Checking your CT direction
DC Troubleshooting webinar - PLEASE WATCH
Configuring multiple inverters as leaders/followers
How to see the paired optimiser serials
How to Enable Arc Fault Protection
See the list of Connected Optimisers


Enabling Arc Fault Protection


